Originally published on Medium.
One Docker container. Dozens of ISOs. Zero USB drives. Here’s exactly how to wire it all together.
Why PXE Boot?
USB drives are the duct tape of IT — slow, lossy, and always formatted for the wrong machine at the wrong time.
If you run a homelab with multiple machines — servers, workstations, mini PCs — there is a better way. PXE (Preboot Execution Environment) lets any machine on your network boot directly into an OS installer or live environment without any local media. Power on, hit F12, pick your OS, done.
This guide walks through the exact setup I use: iVentoy running on Unraid , integrated with a UniFi UCG Fiber router as the network layer. No dedicated PXE appliance, no complicated dnsmasq config, no manually extracted kernels. The result is a live PXE server at 192.168.0.96 serving dozens of ISOs — Windows, Linux, recovery tools — to any BIOS or UEFI machine on the LAN.
Why iVentoy?
Traditional PXE stacks require you to:
- Configure dnsmasq or ISC DHCP with boot options
- Extract kernels and initrd images from each ISO
- Write and maintain PXE config files per OS
- Serve assets over TFTP
iVentoy eliminates all of that. It is a self-contained PXE server that reads ISO files directly. Drop in an ISO, click Refresh, and it is immediately bootable over the network — no extraction, no config files, no restart. It bundles TFTP, HTTP, and NBD servers into a single binary with a clean web UI.
Architecture
Client Machine (PXE ROM)
        │
        │  DHCP Discover broadcast
        ▼
UniFi UCG Fiber (DHCP Server — 192.168.0.0/24)
  ├── Assigns IP from pool: 192.168.0.6 – 192.168.0.254
  └── Network Boot option → Server:   192.168.0.96
                          → Filename: iventoy_loader_16000
        │
        │  TFTP request → downloads iVentoy boot loader
        ▼
iVentoy on Unraid (192.168.0.96)
  ├── TFTP Server (port 69)       ← serves boot loader to client
  ├── HTTP Server (port 16000)    ← serves ISO content
  ├── NBD Server  (port 10809)    ← block device for live boot
  └── Web UI      (port 26000)    ← image management + device inventory
        │
        ▼
Client boots into iVentoy OS selection menu
  └── Select → installs or live-boots entirely over the network
Network layout (UniFi):
Network VLAN Subnet Role
Default 1 192.168.0.0/24 Primary LAN — PXE
IoT 30 192.168.30.0/24 Isolated IoT devices
Guest 50 192.168.2.0/24 Guest wireless
Prerequisites
- Unraid server with Docker enabled (mine runs at 192.168.0.95)
- UniFi controller (UCG Fiber / UDM Pro / Cloud Key)
- ISOs you want to serve
- Target machines with PXE / network boot support in BIOS or UEFI
Step 1 — Deploy iVentoy on Unraid or Proxmox LXC
iVentoy must run in host network mode. Docker’s bridge NAT blocks DHCP broadcasts, which breaks PXE entirely. This is the single most common mistake when containerizing a PXE server.
SSH into Unraid/any proxmox LXC or VM or open the terminal:
bash
# Create persistent storage directories on your array
mkdir -p /mnt/user/iventoy/iso
mkdir -p /mnt/user/iventoy/data
mkdir -p /mnt/user/iventoy/log


# Deploy the container
docker run -d \
  --name=iventoy \
  --restart=unless-stopped \
  --network=host \
  -v /mnt/user/iventoy/iso:/app/iso \
  -v /mnt/user/iventoy/data:/app/data \
  -v /mnt/user/iventoy/log:/app/log \
  iventoy/iventoy:latest
You just need a container or VM where you can run the docker image. I
Mount point reference:
I mounted my ISO library fromUnraid to the ISO folder
Verify the container is up:
bash
docker ps | grep iventoy
docker logs iventoy | tail -20
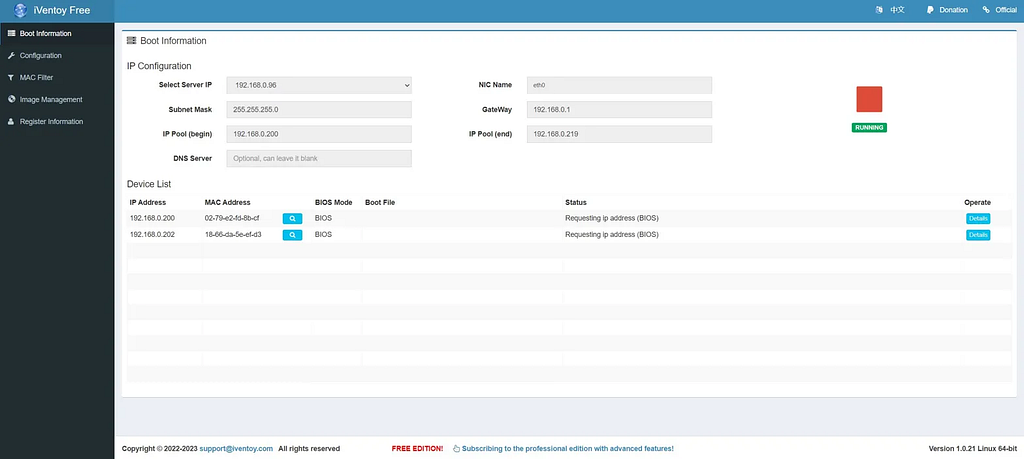
Access the web UI at: http://192.168.0.96:26000
If you use Unraid’s Docker template UI instead of the CLI, set** Network Type → Host** . This is the GUI equivalent of --network=host. Everything else can remain at defaults.
Step 2 — Configure iVentoy IP and DHCP Pool
In the iVentoy Web UI, navigate to Boot Information.
Set your IP configuration to match your network:
Field Value Server IP
192.168.0.96NIC Nameeth0
Subnet Mask255.255.255.0
Gateway192.168.0.1
IP Pool (begin)192.168.0.200
IP Pool (end)192.168.0.219
The RUNNING badge in green confirms all iVentoy services are active — TFTP, HTTP, and NBD.
The Device List at the bottom of this page is your live PXE inventory. Every machine that attempts a network boot is logged here automatically with its assigned IP, MAC address, detected BIOS mode, and current boot status.
[Image: iVentoy Boot Information — IP config, RUNNING badge, Device List showing two BIOS clients at .200 and .202]
On DHCP overlap:UniFi’s DHCP range is 192.168.0.6 – 192.168.0.254, which technically covers iVentoy ‘s pool of _ _.200–.219. In practice this does not conflict. iVentoy ‘s internal DHCP only responds to DHCP Discover packets containing PXE option 60 (__PXEClient). Regular clients — laptops, phones, workstations — never trigger iVentoy ‘s DHCP server. The two coexist cleanly.
Step 3 — Configure TFTP and Boot Settings
Navigate to Configuration in the sidebar.
Network Configuration:
Setting Value Notes
TFTP Server Timeout5Seconds before retry
TFTP Max Retransmit3Retries before failure
HTTP Server Port16000 ISO content delivery — matches
UniFi boot filename (iventoy_loader_16000 )
NBD Server Port10809Used for live and RAM-disk boots
Leave these at defaults unless you have specific port conflicts on your network. The HTTP port 16000 is deliberately embedded in the boot filename (__iventoy_loader_16000) — this is how the client knows where to fetch ISO content after the TFTP handshake.
Boot Configuration:
SettingValueNotes
DHCP Server ModeInternal
iVentoy owns the PXE DHCP pool Boot
Background ModeGUIGraphical OS menu on the client displayBoot Menu Resolution1920x1080Adjust to match your target machinesEFI Boot Filesnponly.efiServed automatically to UEFI clients
Hit Save.
[Image: iVentoy Configuration — Network Configuration and Boot Configuration panels]
BIOS vs UEFI — handled automatically: iVentoy detects the client’s firmware mode from the DHCP request. Legacy BIOS clients receive the traditional PXE binary; UEFI clients receive snponly.efi. No split pools, no per-client config, no manual mode selection.
Step 4 — Configure UniFi Network Boot
This is the integration step that connects UniFi’s DHCP to iVentoy.
In the UniFi controller navigate to:
Settings → Networks → Default → Edit (right panel)
Scroll to the DHCP section and enable Network Boot :
Field Value Boot
Server IP192.168.0.96
Boot Filenameiventoy_loader_16000
The filename convention iventoy_loader_16000 is iVentoy’s design — the HTTP port (16000) is encoded directly into the filename. After the client chain-loads the iVentoy iPXE binary over TFTP, it reads the port from the filename to know where to pull ISO content over HTTP. Clean and self-contained.
Why Option 43 and TFTP Server are both off — this is worth understanding explicitly. Many PXE guides tell you to fill in UniFi’s “TFTP Server” field or configure Option 43 for vendor-specific boot data. With iVentoy you need neither. The Network Boot entry (DHCP options 66 and 67 under the hood) is sufficient. iVentoy’s TFTP server is self-contained inside the container, and the HTTP port is communicated through the boot filename itself. Less configuration, fewer moving parts.
Hit Apply Changes.
On Rogue DHCP Server Detection:UniFi flags any DHCP server it doesn’t expect on the LAN. iVentoy’s internal DHCP only responds to DHCP Discover packets that carry PXE option 60 (__PXEClient) — it is invisible to normal client traffic and will not trigger this alert. Regular devices continue to get leases exclusively from UniFi.
Step 5 — Load Your ISO Library
Navigate to Image Management in the iVentoy sidebar.
Drop ISO files into /mnt/user/iventoy/iso/ on Unraid and click Refresh. They appear in the boot menu immediately — no restart, no config edit required.
Adding ISOs from the Unraid terminal:
bash
# Download directly into the iVentoy share
wget -P /mnt/user/iventoy/iso/ \
  https://releases.ubuntu.com/24.04.3/ubuntu-24.04.3-desktop-amd64.iso


# Copy from a local source on your array
cp /mnt/user/downloads/proxmox-ve_8.4-1.iso /mnt/user/iventoy/iso/


# Verify
ls -lh /mnt/user/iventoy/iso/*.iso
My current library — everything bootable over the network:
Linux / Hypervisors / NAS:
- OPNsense-24.1-dvd-amd64.iso / OPNsense-24.7-dvd-amd64.iso
- TrueNAS-SCALE-24.04.1.1.iso
- proxmox-ve_8.2-1.iso / proxmox-ve_8.4-1.iso
- ubuntu-22.04.3-desktop-amd64.iso / ubuntu-24.04.2-desktop-amd64.iso / ubuntu-24.04.3-desktop-amd64.iso
- linuxmint-22-cinnamon-64bit.iso
- pop-os_22.04_amd64_intel_57.iso
- openmediavault_7.4.17-amd64.iso
- Parrot-security-6.4_amd64.iso
Windows:
- Win10.Pro.19045.4529.iso
- Win11_23H2_English_x64.iso / Win11_24H2_Eng_x64.iso / Win11_25H2_English_x64.iso
- Windows All (7, 8.1, 10, 11) AIO 43in1
- en_windows_server_2019_…aio_6in1_x64.iso
- en_windows_server_2022_…aio_8in1_x64.iso
- en_windows_server_2025_…aio_4in1_x64.iso
Recovery / Utilities:
- gparted-live-1.6.0-10-amd64.iso
- rescuezilla-2.4.2-64bit.jammy.iso
- netboot.xyz.iso
[Image: iVentoy Image Management — full ISO library with folders and individual ISO files visible]
Step 6 — Boot a Client Machine
- Power on the target machine
- Enter BIOS/UEFI → move Network / PXE Boot to first boot priority
- Save and reboot
- Watch the handshake on screen:
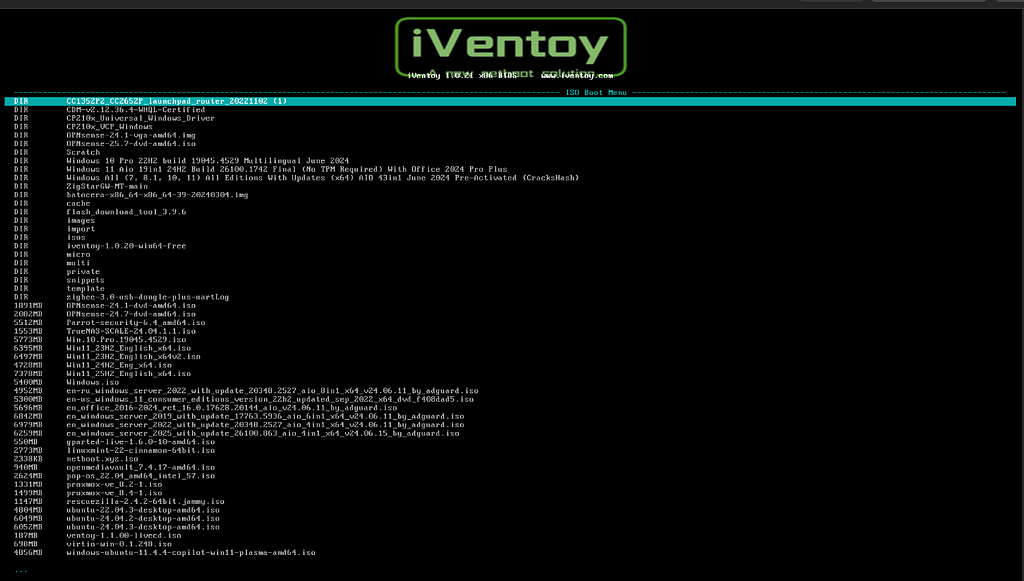
The iVentoy OS selection menu appears. Choose your target — the ISO streams entirely over the network from Unraid. No USB, no optical drive, no local media of any kind.
Built-In Inventory — No Extra Tools Needed
The Device List on iVentoy’s Boot Information page is your automatic network asset record. Every machine that PXE boots populates it:
IP AddressMAC AddressBIOS ModeStatus192.168.0.20002-79-e2-fd-8b-cfBIOSRequesting IP address192.168.0.20218-66-da-5e-ef-d3BIOSRequesting IP address
You get MAC address, assigned IP, firmware mode, and boot status for every device that has touched the PXE server — no Netbox, no spreadsheet, no additional tooling required.
For deeper tracking, tail the container log or snapshot it on a schedule:
bash
# Watch live PXE events on Unraid
docker logs -f iventoy | grep -E "DHCP|TFTP|client|boot"


# Daily snapshot via Unraid User Scripts (schedule: 0 2 * * *)
#!/bin/bash
DATE=$(date +%Y-%m-%d)
OUTDIR="/mnt/user/iventoy/inventory"
mkdir -p "$OUTDIR"


# iVentoy boot log snapshot
cp /mnt/user/iventoy/log/iventoy.log "$OUTDIR/iventoy_${DATE}.log"


# UniFi DHCP leases — full LAN inventory
ssh -o StrictHostKeyChecking=no root@192.168.0.1 \
  'cat /run/dnsmasq.leases' > "$OUTDIR/dhcp_leases_${DATE}.txt"


echo "[$DATE] Inventory snapshot saved to $OUTDIR"
MAC Filter — Restrict PXE Access
iVentoy includes a built-in MAC Filter under the sidebar. Useful for preventing production machines from accidentally booting into an installer.
Two modes:
- Allow Mode — only whitelisted MACs can PXE boot
- Block Mode — all MACs allowed except a blocklist
Add MACs in the format XX-XX-XX-XX-XX-XX. Per-machine access control with no firewall rules or VLAN changes needed.
Troubleshooting
What This Stack Gives You
CapabilityHowBoot any OS over the networkiVentoy + ISO library on UnraidBIOS and UEFI support simultaneouslyiVentoy auto-detects per client — no split configUniFi DHCP integrationTwo fields: server IP + boot filenameLive device inventoryiVentoy Boot Information → Device ListMAC-based access controliVentoy MAC Filter — allow or block per machineAutomated log snapshotsUnraid User Scripts cron jobZero dedicated hardwareSingle Docker container on existing Unraid server
Final Thoughts
The whole stack — iVentoy on Unraid, wired into UniFi via a single Network Boot entry — takes under an hour to stand up. After that, every machine on your LAN becomes instantly provisionable.
The key insight worth carrying away: iVentoy’s internal DHCP and UniFi’s DHCP are complementary, not competing. UniFi handles all regular client leases and uses its Network Boot option to hand PXE-specific requests off to iVentoy. iVentoy owns the session from that point — TFTP handshake through ISO delivery. Two servers, clean division of responsibility, no conflicts.
For anyone running a homelab with more than two or three machines, this is the infrastructure investment that pays back every time you need to reinstall, recover, or stand up something new.
Published under abambah@gmail.com
Tags: homelab networking unraid unifi pxe iventoy sysadmin infrastructure self-hosted